- Mark as New
- Bookmark
- Subscribe
- Mute
- Subscribe to RSS Feed
- Permalink
- Report Inappropriate Content
Underlying geometry shows through materials with textures in them(see pics)
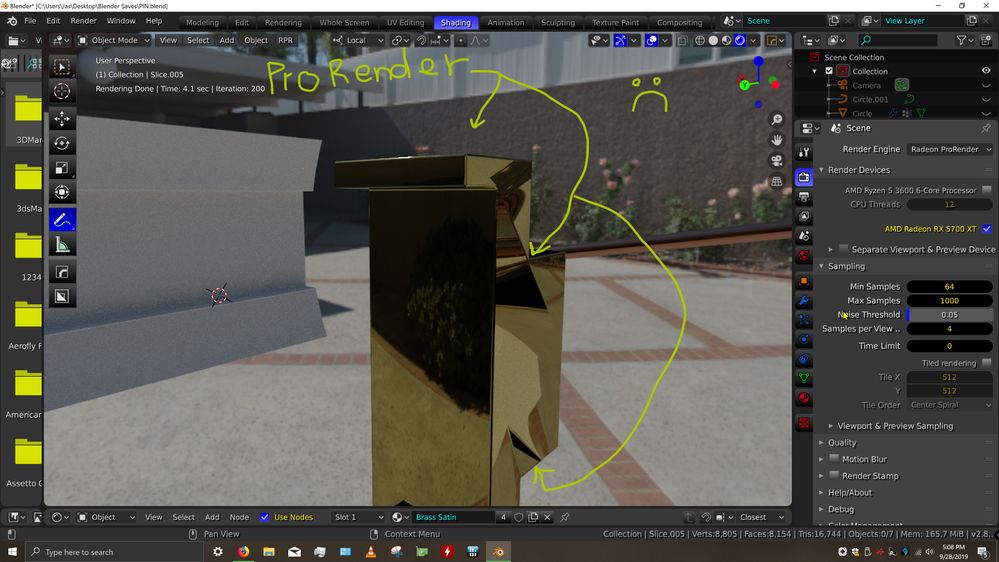
Whenever I render an object with a material applied which uses an image texture in it, (not ones with just shaders), the underlying geometry shows through in reflections. This is even more evident if the material is shiny and metal, but what it's showing is not the actual geometry worked with in blender, but instead it's the "hidden" geometry that you see if you render in ProRenders "wireframe" pass. I don't know if ProRender creates this "triangulation or if it's just hidden N-gons that blender uses. But it looks to me like it is affecting the surface normals maybe? It doesn't show any of this if I render in Cycles or in the shaded viewport mode. I am still a bit of a beginner when it comes to UV unwrapping etc. but this seems to be related to somethin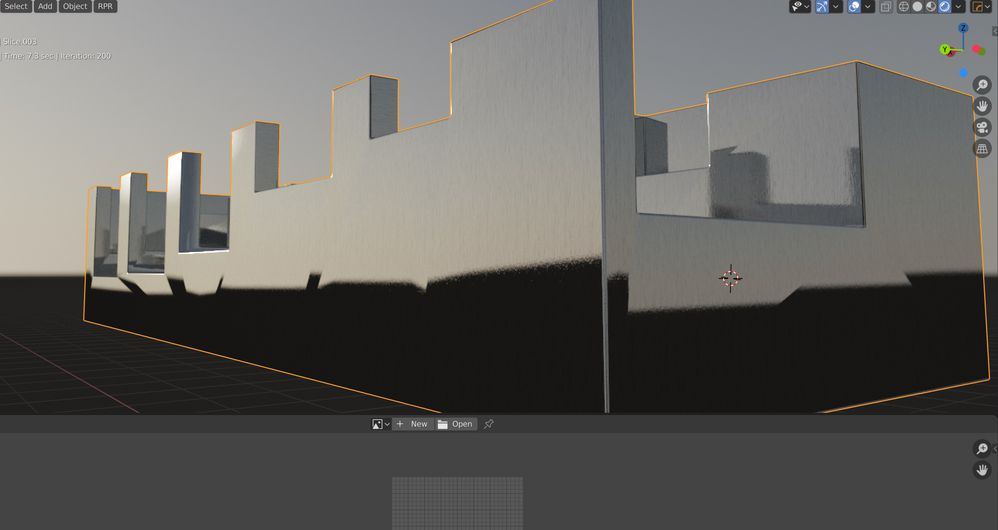
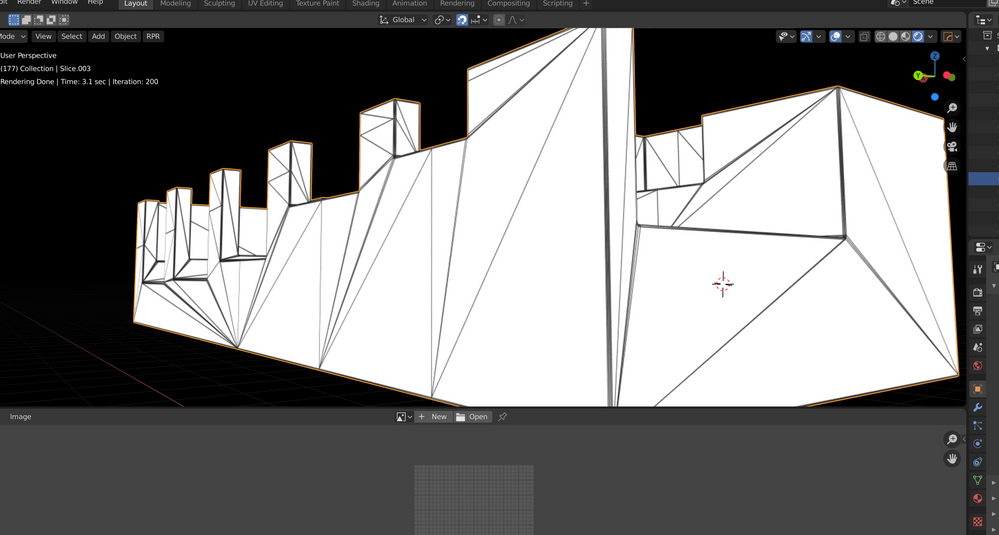
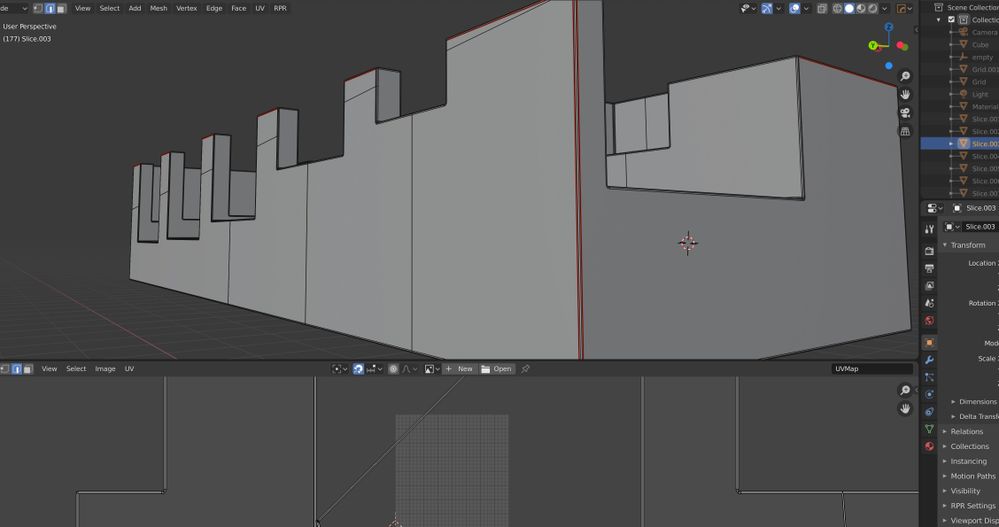
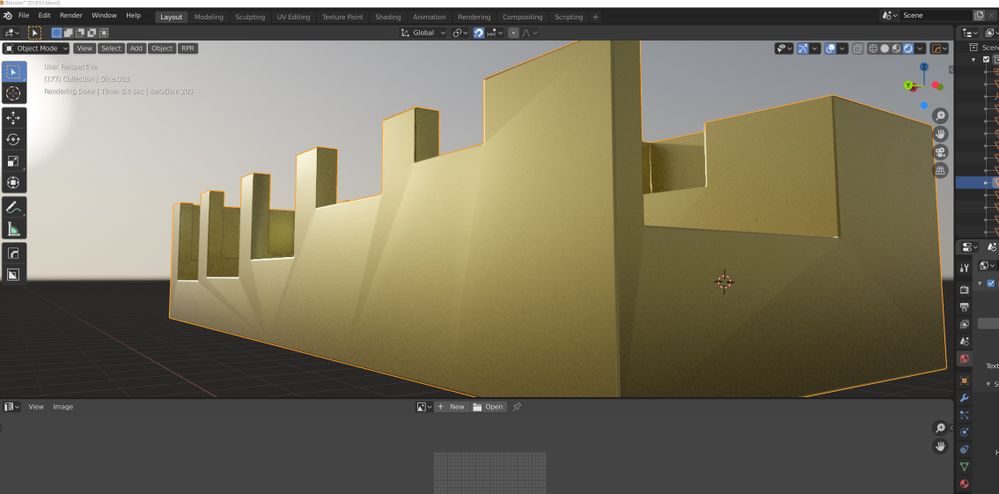
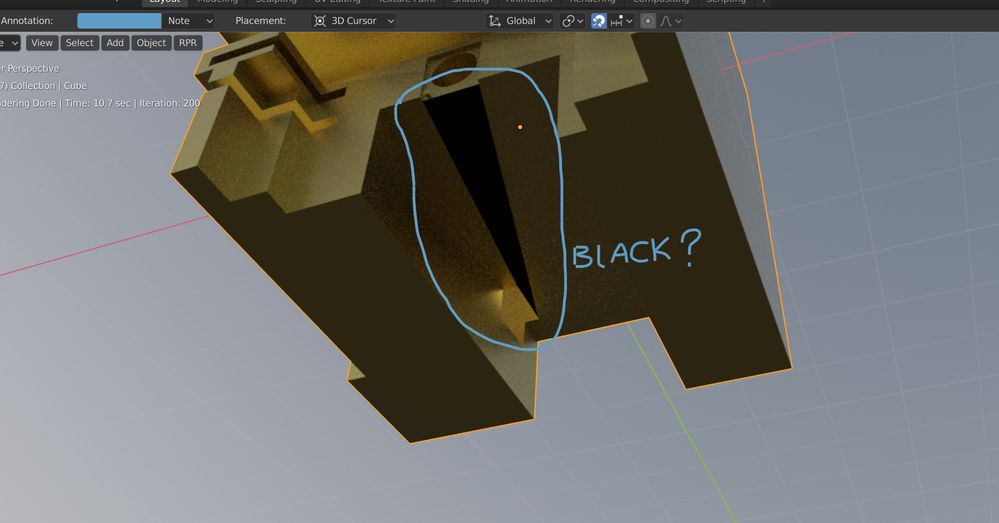
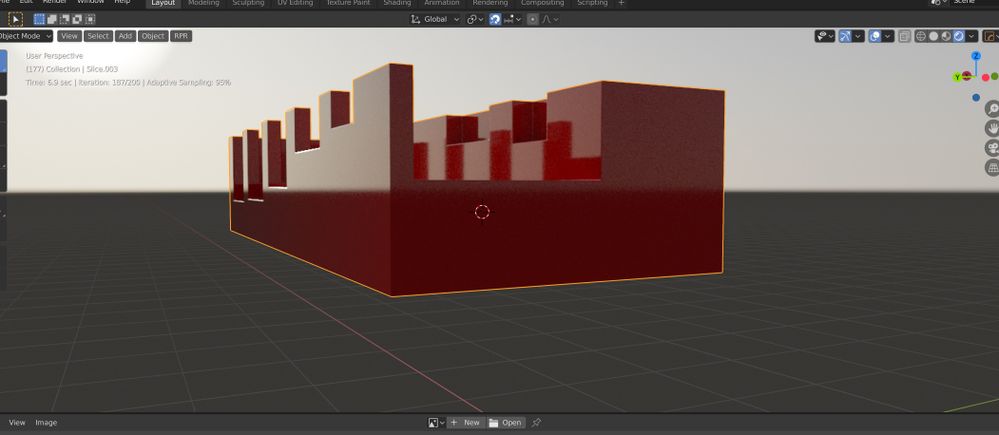
I get these same results on both my pc and imac, so I must be doing something wrong, do I have to "Bake" something to avoud this? Thanks
- Mark as New
- Bookmark
- Subscribe
- Mute
- Subscribe to RSS Feed
- Permalink
- Report Inappropriate Content
Can you attach a scene?
- Mark as New
- Bookmark
- Subscribe
- Mute
- Subscribe to RSS Feed
- Permalink
- Report Inappropriate Content
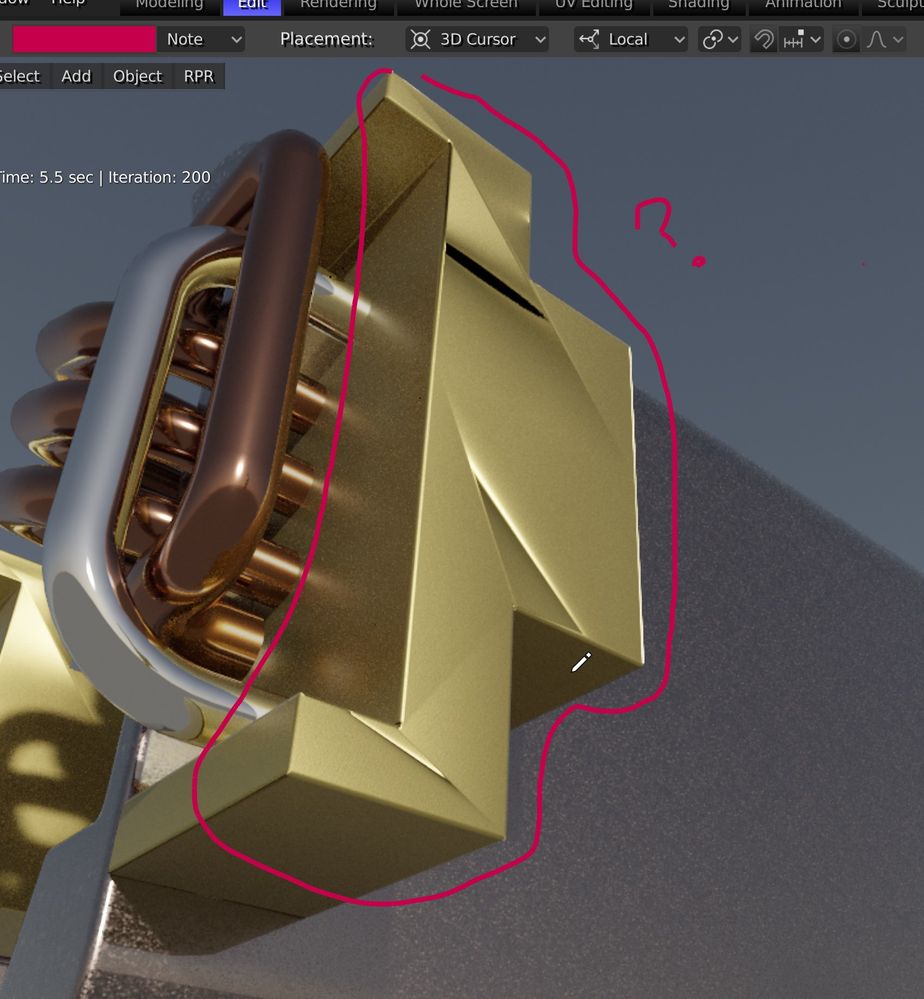
This is same issue as in my original post, Although the severity changes with geometry and material. These are all prorender materials. This only seems to be visible if the material uses texture maps for anything,(diffuse,reflection, etc.) if I apply something procedural like car paints it's fine. Also changing the uv scale or positions does alter the behavior, but doesn't make it any better. also adding geometry, or even subdividing the surface changes, and sometimes makes it a little bit better. I've also tried triangulating in different ways. Sometimes it looks just like there is one of the beveled 90 degree corners just running right straight across the middle of a flat face, and orbiting around it behaves just like it was a corner, with the reflections moving and all. it's kind of feels like it's getting messed up and putting the surface it's rendering in the wrong place on the mesh. Tab into edit mode while rendering and all the screwiness goes away. Also, thanks for the response to the white light noise issue, I know the geometry was kinda whacked, it was just to try to figure that issue out. I have since got an RX5700XT and I don't seem to notice the white noise as much now, but this issue has persisted though. It really sucks to have to plan everything I create to not use materials with textures, at least reflective textures, I can kind of hide this if it isn't to metallic.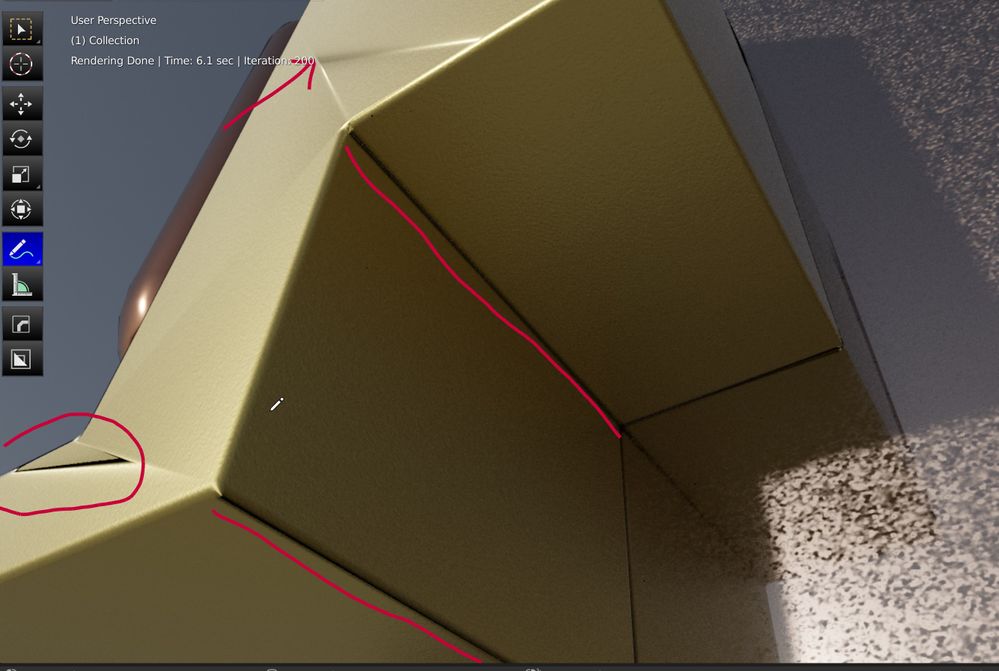
- Mark as New
- Bookmark
- Subscribe
- Mute
- Subscribe to RSS Feed
- Permalink
- Report Inappropriate Content
OK, here is a .blend file which I have replaced the RPR Uber shader in the polished brass ProRender material so that it will actually render in cycles. It doesn't look exactly the same but it will work. If all the needed textures are with the file than you should be able to load the model and switch back and forth between both cycles and RPR and see that the same model, with same UV, and same material renders just fine in cycles and really messed up in ProRender. Somebody tried telling me I had to "triangulate the mesh before rendering, because he said it was similar to Octane render and it needs all triangulated geometry, but I really think that would have been mentioned by AMD if that was the case. In case the file doesn't work, or help, here is 2 pictures, the same view angle, and same HDRI, although two different background node setups. (I don't know if the file saves all render setups and nodes) You can clearly see although different, the Cycles render has none of the mess in the reflections. And I can change how the mess "appears" by either altering the UV or knifing topology into the mesh, but it just seems to divide it up, or, move it closer to the edges, and This problem is almost unnoticeable if the mesh is wrapped, if you remove the uv-map, you can barely see the "lines" where this is happening. They are still there but hard to see, and the normals seem to be correct, but you obviously also have no textures on your materials then either.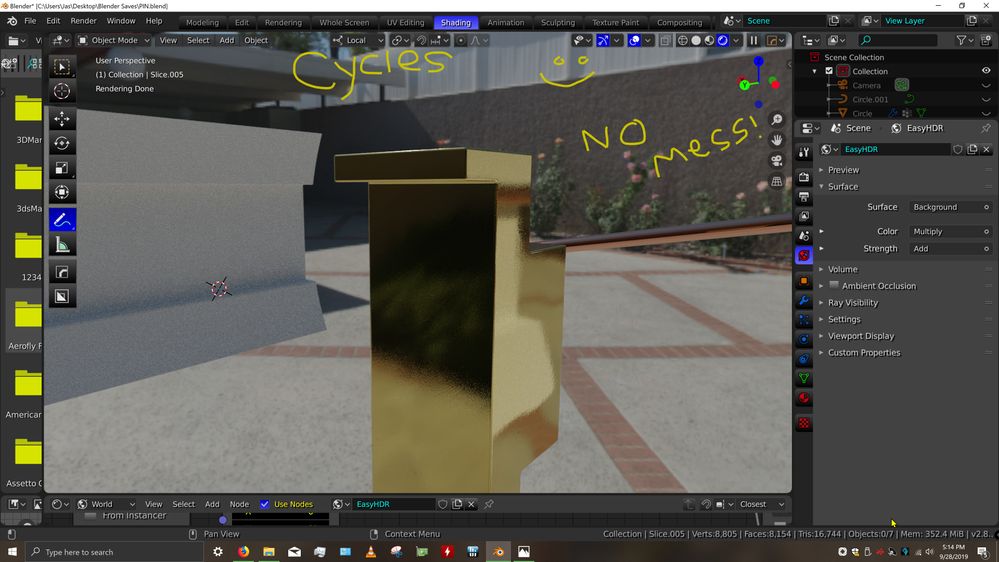
- Mark as New
- Bookmark
- Subscribe
- Mute
- Subscribe to RSS Feed
- Permalink
- Report Inappropriate Content
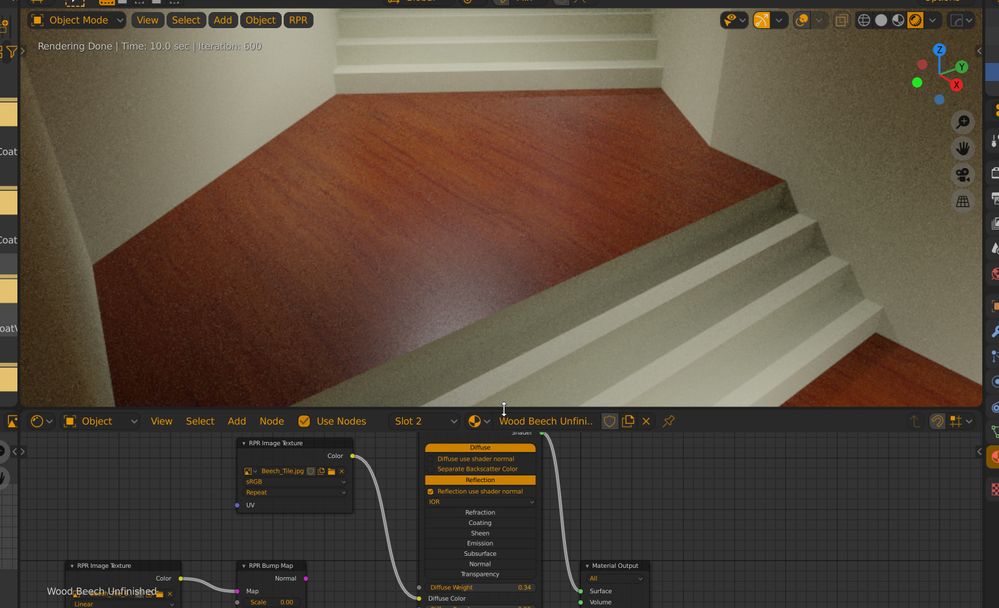
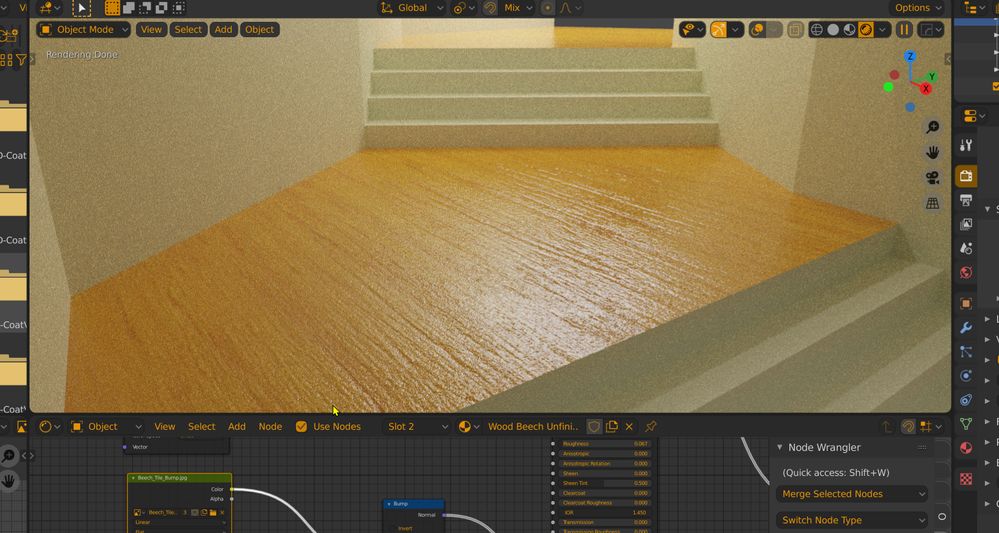
I Guess I am just going to have to give up, because either nobody else is having this problem, which is odd because it is present on both my PC and my Mac, or nobody out there is actually using this software. Also I might just be an idiot, I really, REALLY like every other aspect of ProRender and have become very comfortable using it, but hitting this roadblock really stops my progress. Not that it's gonna go anywhere, but here is one more example if this problem. I just made absolutely basic simple mesh, a hallway, and added only the prorender "wood beech unfinished" to the landings. I turned the bump strength to 0.00, (even though it still screws it up just as bad with the bump up, this makes it clearer) So basically the only difference between the two screenshots is that one is using the default shader normal, and the other one is using the texture bump normal instead, with the actual "bumpiness" turned down to zero. It looks like having if you have a bump vector node connected to the shader, either an RPR Uber or principled BSDF, prorender completely messes up the normals. And it does this even if there is no texture connected to the bump node. Just like before, this absolutely does not happen at all when the same material, with the same nodes is rendered in eevee. SO if I can't figure this out I will have to continue using cycles, yet I really want to be using ProRender. Please try to help me find an answer to this, because if it's just me doing something wrong, I really want to find out what that is. Thanks-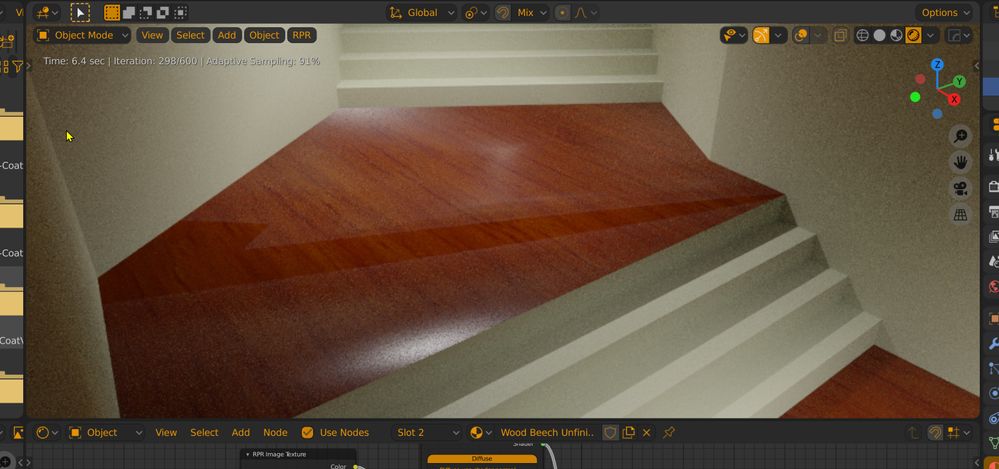
- Mark as New
- Bookmark
- Subscribe
- Mute
- Subscribe to RSS Feed
- Permalink
- Report Inappropriate Content
i've tried matching your results here with no success, can you tell me your RPR version and blender version please?, now i am really curious about that issue.
ps blender file didn't render here it just gives an error.
- Mark as New
- Bookmark
- Subscribe
- Mute
- Subscribe to RSS Feed
- Permalink
- Report Inappropriate Content
Thanks for trying to help me with this, it has been a problem for me for almost a year now, and it does exactly the same on both my PC and my Mac. I have the latest ProRender, up to the latest with the Hybrid-Viewport thing, because that version seemed to have some issues. For Blender I try to use the most current nightly releases of 2.81, but it has done this on both the 2.80 betas and final also. I don't know why it wouldn't render, I opened the first .blend I posted here and that one wouldn't render for me for some reason until I removed and re applied one of the materials, any one, so that's weird. Basically if I render any material containing a image texture, which requires a UV map for correct placement, it seems to really normals somehow. Because this only becomes visible if I have an actual normal map image connected to the normal input node on the shader. obviously on a shinier material this is more obvious, it looks like when it is trying to "fake" the illusion if height with the normal map, it is getting disrupted by the underlying geometry which is clearly shown when rendered in the RPR wireframe render mode. when its metallic it is the worst. I have tried to make as interchangeable scene as possible, between cycles and RPR but its difficult when they can't share world settings and various other nodes and converters. But I have come close and where ProRender clearly makes a mess of normals, cycles does not, the closest I get is if I turn off auto-smooth, on the object, then those same lines appear, although much milder, and they also then appear in the shaded veiwport too, since it cancels the weighted normals mod. (and yes I have experimented with the w.Normals Modifier and it seams not to apply at all to rendering with prorender.) Thanks for any help you may give.
- Mark as New
- Bookmark
- Subscribe
- Mute
- Subscribe to RSS Feed
- Permalink
- Report Inappropriate Content
Well maybe this .blend will work. If it can the material on it is the RPR mahogany on the landing, and it is a good example of the screwy reflections, and in wireframe render it does seem that it is solving the geometry kind of heavy in the direction of the distortion, although not nearly as sharply as a reflective metallic with a environment to reflect. but if you go into the material node and one at a time disconnect the three different normal typed you can see that the Diffuse, reflection, and clear-coat normals are all contributing to this. Thanks.
- Mark as New
- Bookmark
- Subscribe
- Mute
- Subscribe to RSS Feed
- Permalink
- Report Inappropriate Content
i tested jl5086_1.blend.zip in the first try, but now i downloaded PIN 33.blend.zip to test again and it worked, but if a select something it just give me the same error as before.
I will test this new file tomorrow, here are some of my tests using a fx 6300 and a rx 460 with 8gb of ram
os: windows 10
blender version: oficial 2.80
Radeon Pro Render version:2.0.150
tested using lookdev in full mode because it doesn't render in high, medium or low (i've forgot to use rendering, will be in tomorrow test)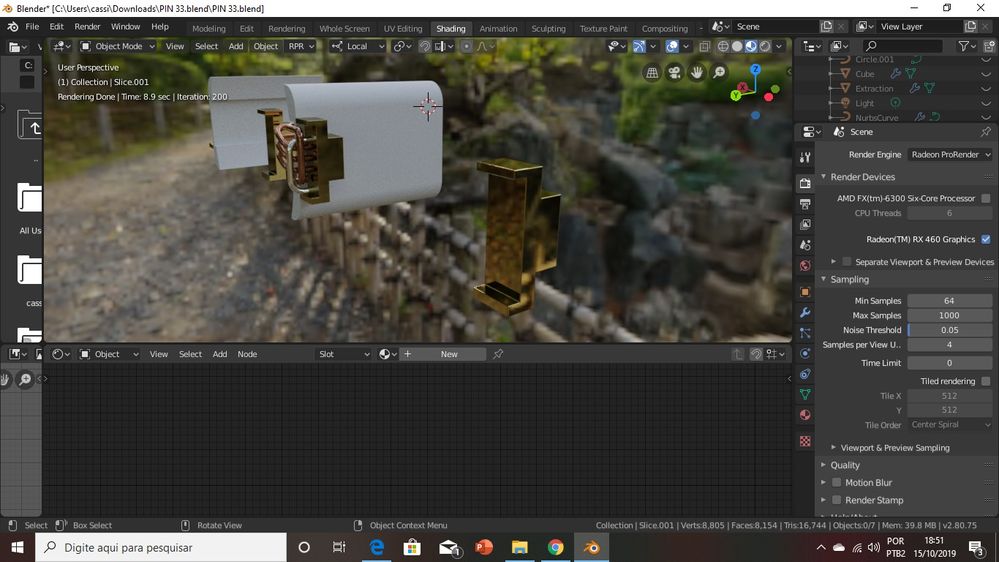
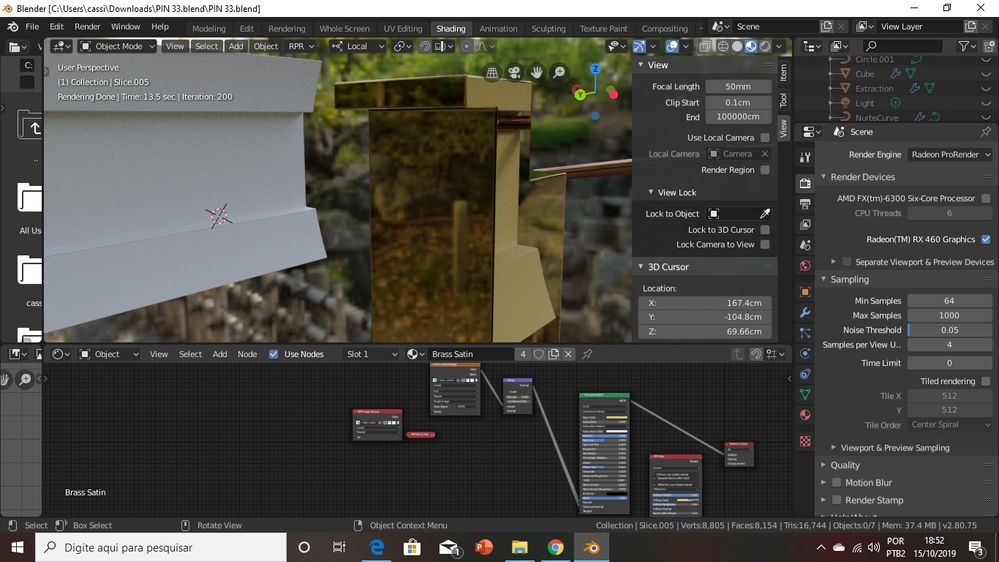
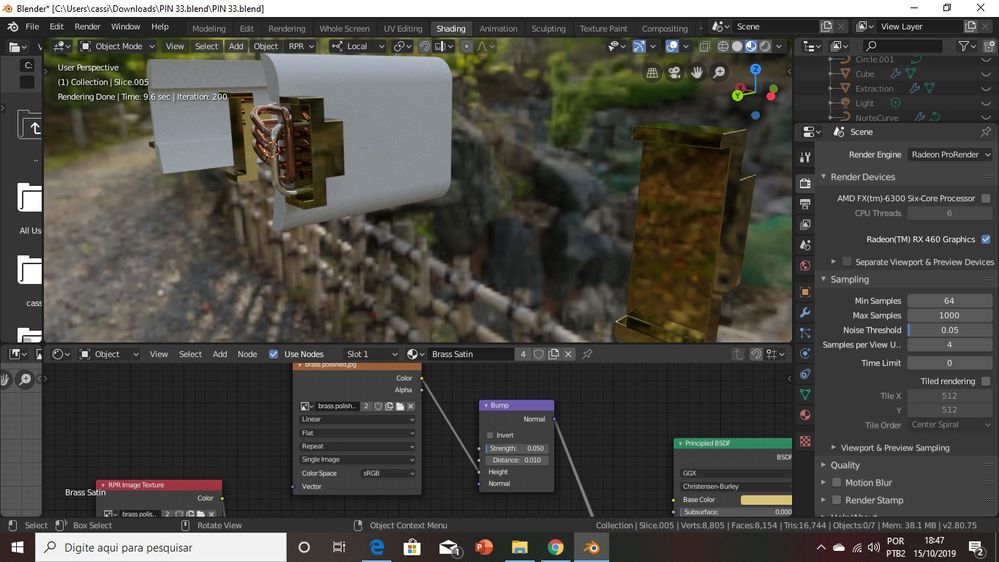
and the image of the error just in case (maybe one report)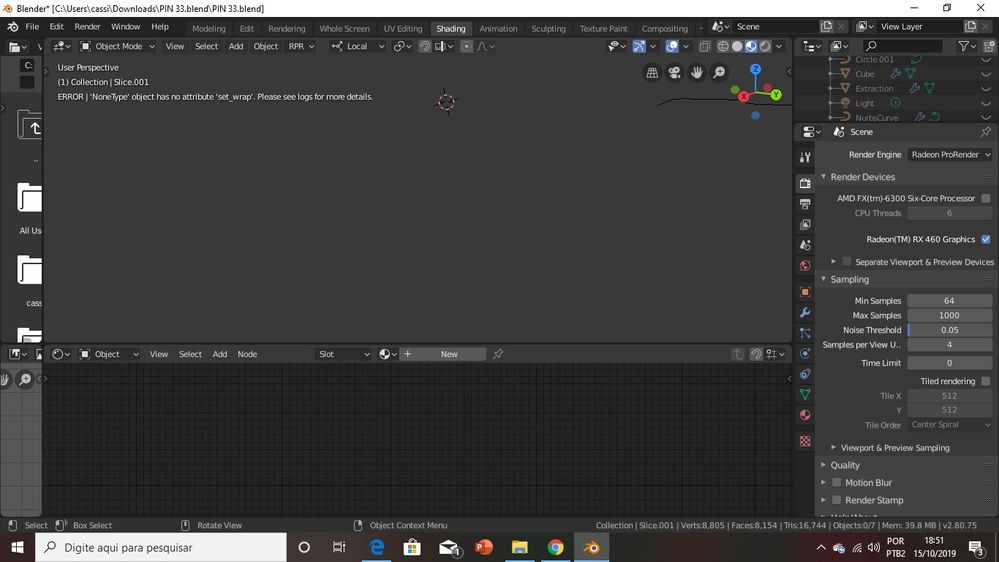
- Mark as New
- Bookmark
- Subscribe
- Mute
- Subscribe to RSS Feed
- Permalink
- Report Inappropriate Content
Thanks again for trying here to help me, there's only a few actual AMD employees that respond on here and I guess they don't think this is a problem, since they stopped trying to help after 1 response. I noticed your using the newest Prorender with the hybrid viewport, maybe it works good for you, but it was pretty crude and kept crashing and really not working well for me, so I went back to the regular version, since I really don't need that openGL mixed in, ProRender is quite fast enough on it's own for my needs. You should know that the PIN33.blend file seems to have issues with multiple user data that seems corrupt, i.e. it won't allow me to make single user copies of those gold mesh objects, so these errors may be related. also in your renders it doesn't look like your mesh with the brass satin materials are unwrapped for some reason, because they are perfectly shiny, and that material is supposed to have a slight texture to it. So if they are not un-wrapped it will not be using the texture normals at all, and the issue were looking for will not be present. In this file in particular I was trying to make everything so that you could just simply , without making any other changes, just switch between cycles and prorender to see that cycles shows the normal maps correctly and RPR was not. So that's why that brass material is a mix up of Principled shader and other RPR nodes, so that could also be causing an issue for you. You may want to just remove that material and replace it with the Brass Satin material from the RPR material library, along with doing a smart unwrap of the object. Also, that object has a bevel modifier on it but it won't let you apply it because of the multiple users issue, but I have already tested to see if having the bevel mod applied before unwrapping fixes this issue, and it does not, it does change it, and sometimes for the better, but that's only because of the way it triangulates it is a little different with extra geometry of the bevel. Lastly, my images I posted first of this .blend file was using the "Sun & Sky" and not an HDRI, it does seem to show the issue a bit more than a busy HDRI, especially a lower res one. Good luck, and thanks again for trying!
- Mark as New
- Bookmark
- Subscribe
- Mute
- Subscribe to RSS Feed
- Permalink
- Report Inappropriate Content
i tested this new file (normals12.blend) and it gave me the same error as before, but this time i discovered why and its because of the missing textures, i dont have the materials library here yet, but i used some textures i've already had downloaded from cc0 textures.com(wood30) to test and again it didn't looked wrong so i started to think it may be in the version 2.0.94, but since a newer version appear to dont work for you right now, i started to think about a temporary solution, and i thought about something i use a lot i my workflow and it consists in using a shader (or shaders) to "uv unwrap" the object for you.
so lets start with Cycles because is the render engine we normally use as reference.
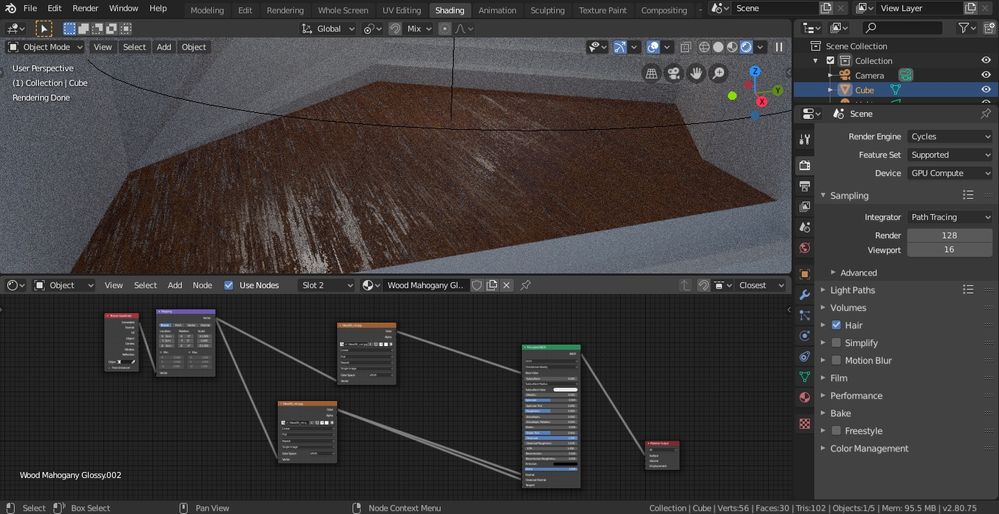
here i used texture coordinate in the generated in vector of mapping node and by default this is the result (used sky in color in the environment in color settings to better match RPR
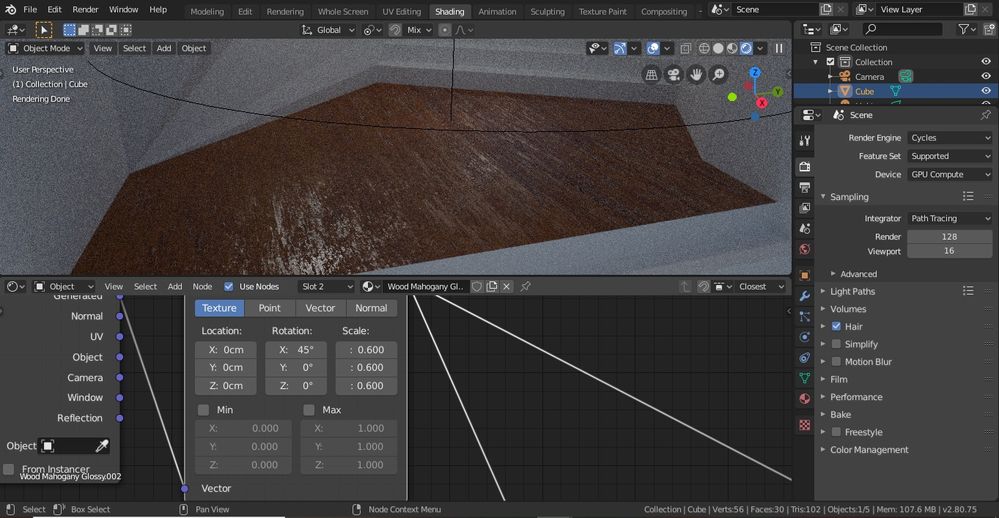
with some adjustments i can look better.
but now its time to talk about Radeon Pro Render, and in RPR its even better because you only need one shader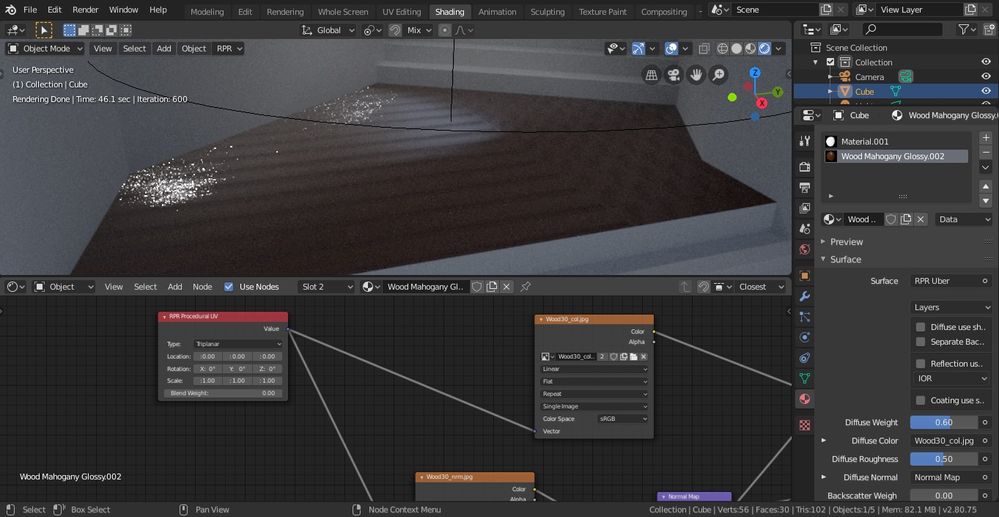
RPR Procedural UV node set in triplanar mode connected in vector of the textures for color an normal map (also used Sun & Sky)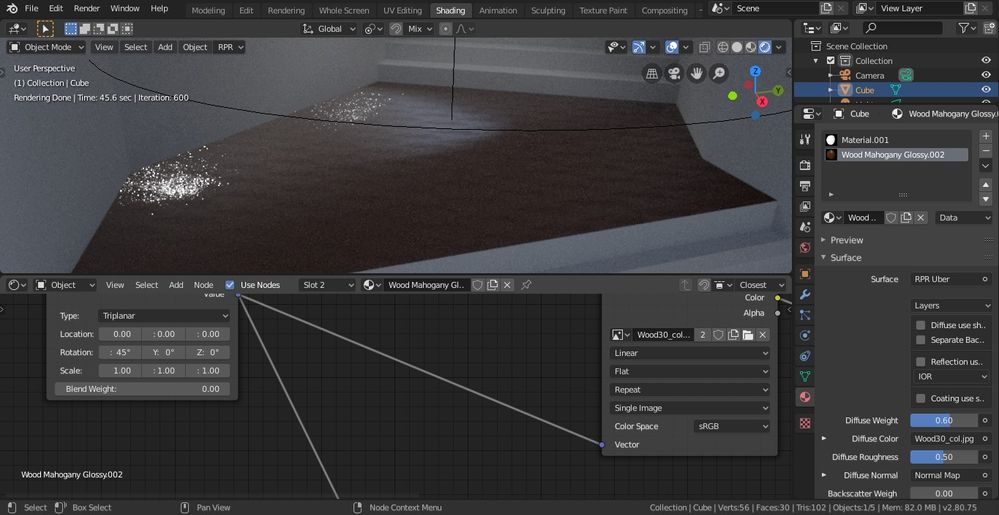
again with some adjustments it can suites you better
i hope that using RPR Procedural uv node may help your if you cant upgrade to a newer version of RPR right now
i will also add the edited blender file here if you want to test,
- Mark as New
- Bookmark
- Subscribe
- Mute
- Subscribe to RSS Feed
- Permalink
- Report Inappropriate Content
First I REALLY want to thank you again for being willing to try to help me, thank you. Now In your images, the ProRender renders are DEFINITELY screwed up. If you just look at the reflections of the lights in the floor they are entirely in the wrong place, and you are even seeing to sky reflecting in a way that it should not be. After experimenting with your file, the only thing I see the procedural UV node visually having a big effect on is the layout of the diffuse texture, although I am sure it is changing the position of the normal texture too, but because they are being so distorted by ProRender it's not even visible to the eye. You can clearly see, based on looking at the Cycles renders, exactly where the reflections of the 2 lights SHOULD be, and the way that the wall color SHOULD be reflecting mildly along the edge. Yet in any of the ProRender renders, the reflections are all smashed to the left, and even the actual "cone" of light from the spot light is not being represented in the correct position on the floor. And taking a more angled view of the ProRender renders shows that the "Faking" of height by the normal maps is being done, but just all wrong. If I unhook, or disable those normal maps, and use the regular shader normals, the reflections and location of the light cone is EXACTLY where it should be, just where it is in the Cycles renders. I had deliberately turned of the enviroment lights in these particular tests to make it as similar as possible between cycles/RPR. I am running version 2.0.112 of ProRender, which is the most current one before this "full spectrum" release, which I had installed once, but now refuses to install for some reason. but this issue has been a problem for me ever since I first started trying to use ProRender over a year ago. Now it's time for some of today's results:


- Mark as New
- Bookmark
- Subscribe
- Mute
- Subscribe to RSS Feed
- Permalink
- Report Inappropriate Content
i'm really happy to help, but with the tests i did today, i'm afraid we will have to wait for a update in pro render, because i found a way to make reflection with normal texture work almost right, but with this the function of the normal texture is almost none and if i get the normal to work right the reflection gets wrong.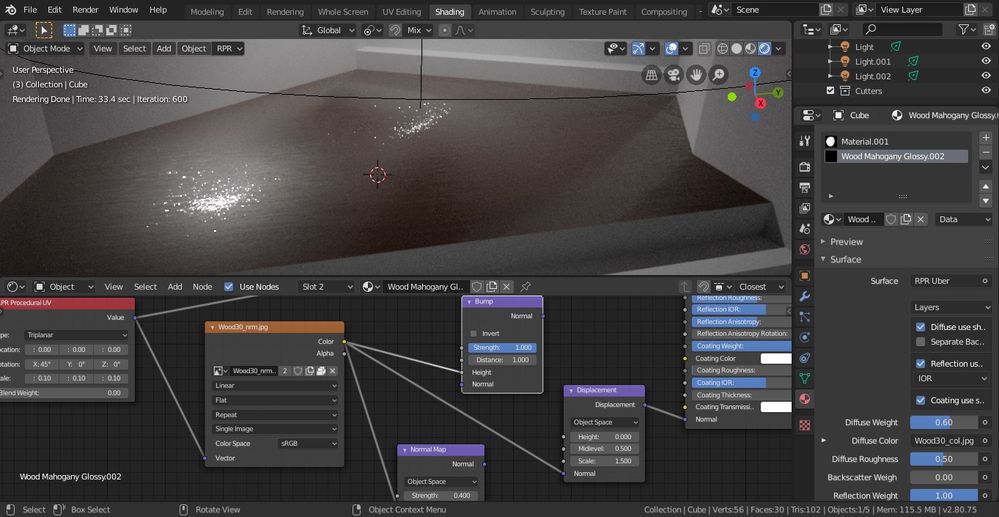
Diffuse, Reflection and Coating use the same normal, used Displacement node to use normal, reflection is right, but normal effect is almost none.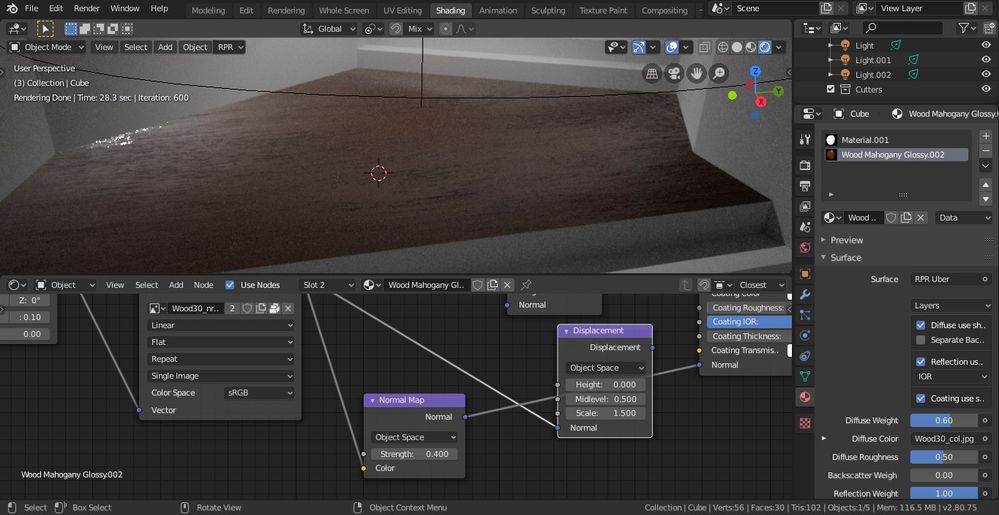
normal is working, but is also messing with reflection.
i'm sorry, but i am afraid i can't help much now since this only depends of the dev.
i will check if i did something wrong (aside from using Displacement node for a normal texture) and update if needed and reply or question also, but now we both have the same problem until a newer update, sorry for not being able to help much more.
- Mark as New
- Bookmark
- Subscribe
- Mute
- Subscribe to RSS Feed
- Permalink
- Report Inappropriate Content
Hi. Sorry coming back to this thread here. Where is the issue you think? When hooking up the normal map the reflection goes away you claim?
Sorry I haven't kept up with all the responses!
- Mark as New
- Bookmark
- Subscribe
- Mute
- Subscribe to RSS Feed
- Permalink
- Report Inappropriate Content
Hi bsavery, with how much we have posted here I really hope the problem I am having with prorender is evident to you. I do have a hard time believing that this could really be an actual bug in the program, so I am hoping that It could even be something I am not doing correctly, although the fact that I can clearly get correct results when rendering the exact same scene in cycles makes me wonder. My original post was simply that the reflections of ANY material I rendered in prorender, that relied on an image texture of any type would show the underlying triangulation of the mesh. This would not happen at all if the material used generated textures i.e. veronoi or noise etc. which don't rely on UV for placement. As I and later Gabrielgo kept trying to figure this out, what I see is that, When rendering in ProRender, whether I use Ubershader or principled if I use an image texture of any sort in the normals (an actual normal map or using a converter node) it is wreaking havoc on the normal reflection and normal height. Depending on the situation, the underlying mesh triangulation seems to be in some way interacting with this. Like the upper image I posted with the satin brass RPR material, the normals are being really tweaked and you can see where sometimes it is so bad that the normals are almost "faking" a corner where it is actually a flat surface, and this is much more apparent to see in the metallic materials like gold. I can change this behavior a bit by adding some more geometry or changing the bevels, but it's a real problem when it's something that isn't happening at all when using Cycles to render the same mesh with the same materials. This very last set of messages between me and Gabrielgo is a very strait forward example of this happening on a very simple mesh, I explained it as well as I can, it clearly shows the reflection, clear coat reflection and diffuse normals ALL making the material NOT behave as it should, or as it does in Cycles. You can disconnect or use the RPRUber toggles to "use shader normals" and clearly see, one at a time the way each of these normals are not doing what they should be, they are causing the light on the materials to be way off from where it should be, and the reflections also way off, and causes the shadows to be totally screwed up. So to be clear: What refereed to as "geometry showing through" is more specifically ProRender appears to be calculating the normals of each "Triangle", when the mesh is triangulated, at an incorrect angle, and therefor when an image texture is used to give the surface it's "fake" height these discrepancies are visible when light is reflecting off it, and even more so when the material is metallic. Even non metallic materials, like the wood floor in my test renders at the end, are being skewed by these normals. If you look at the polygon which makes up that wood "landing" in the pics, if you render that in prorender's "wireframe render mode" it shows that it is triangulated pretty heavily because of it's irregular shape, and that is somehow causing prorender to tweak the normals and have all the distortion shown above, I even included a low angle render of the surface to show the fact that it is WAY off. and simply adding a knife cut across it will change the way it distorts it consideribly, but also does not fix it. Just like altering the UV layout will change the way it looks, but it's never "right". I feel that if this was something flawed that I am doing wrong, that the EXACT same node setup, just switching from RPR to Cycles, wouldn't be giving perfect results. The only way I can ever really see any of that "hidden" triangulation with cycles is if I shade flat and turn off AutoSmooth, along with no weighted normals modifiers, but for whatever reason the AutoSmooth function doesn't seem to have the same effect when using ProRender. I will gladly send you anything you may need to help figure this out, I REALLY do want to use ProRender, but this issue is present on RPR 2.0.94 and 2.0.112 (both on my win10 PC and MacOS) I installed 2.0.150 once and it crashed blender constantly, and now I can't get it to install at all ( I have another post about that elsewhere). But for now this is much more important to figure out for me, Thank you again.
- Mark as New
- Bookmark
- Subscribe
- Mute
- Subscribe to RSS Feed
- Permalink
- Report Inappropriate Content
Just thought I might add some more, I really don't know why this question is marked "assumed answered" but.....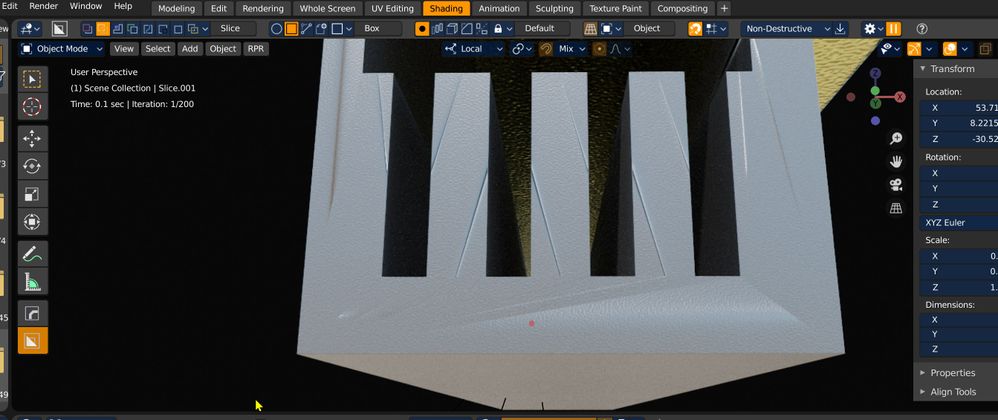
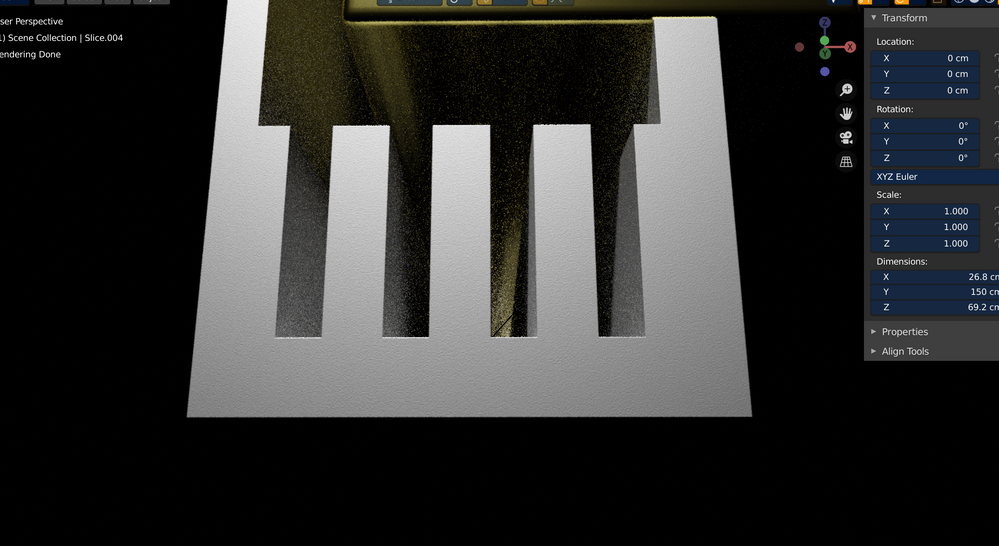
FWIW changing the bevel on the mesh has an impact on how bad the results are with prorender. If I had to guess, this seems to maybe be caused or influenced by the autosmoothing or some other normal calculation process, but I obviously don't know nearly enough to really help.
Thanks.
- Mark as New
- Bookmark
- Subscribe
- Mute
- Subscribe to RSS Feed
- Permalink
- Report Inappropriate Content
Hi bsavery and hi jl5086, sorry for the delay, but i come to show the results of my tests still using the same scene (normals12) and using uvmap not procedural .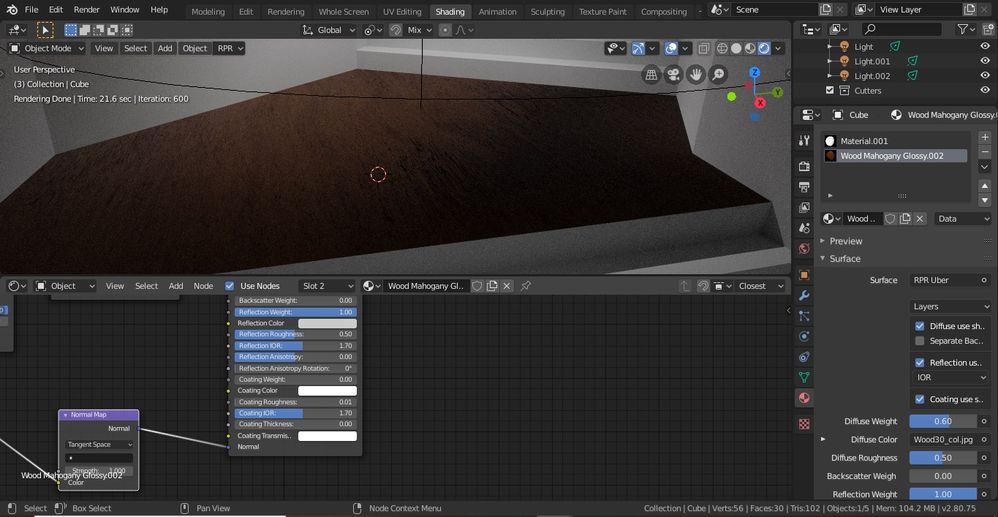
using RPR Uber
the reflection are in correct place, but is too dark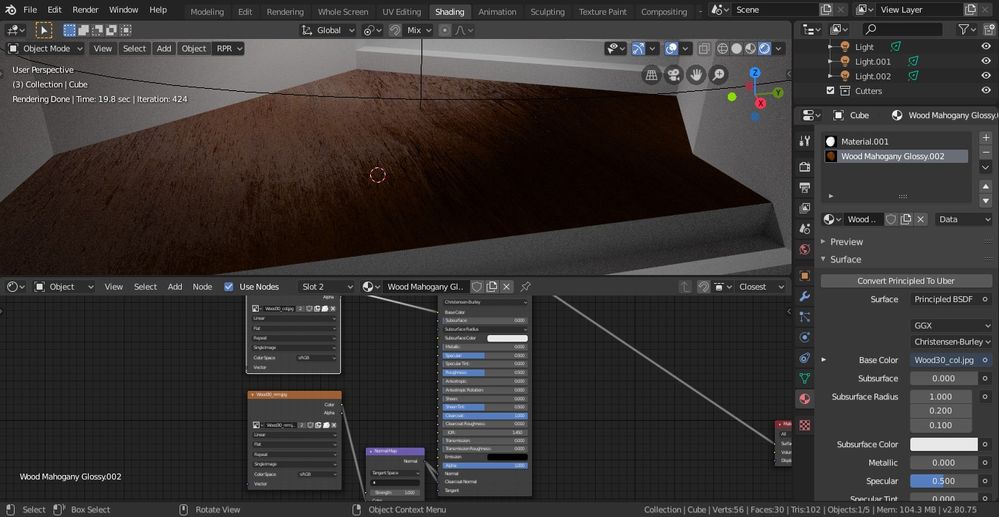
this time using principled bsdf
is a bit better, but still dark and give this warning on the console
2019-10-31 10:00:43,711 WARNING rpr.export.rpr_nodes [6532]: Normal input is not supported by ShaderNodeBump node
- Mark as New
- Bookmark
- Subscribe
- Mute
- Subscribe to RSS Feed
- Permalink
- Report Inappropriate Content
Thanks once again gabrielgo for your attention to this. When I do run into this problem using ProRender, I tend to either: add some more geometry to the topology, unwrap it differently, choose (or make) a different material, or just use Substance Painter to make the maps for the mesh. While using Substance Painter maps does a better job, I don't like to have to go through all that work on something simple that should be easily done within blender/ProRender. I think between the two of us we have provided plenty of information for anyone who wants to help to find an answer, and the bottom line is in the most simple examples I have shown, using ProRenders own Ubershader, the results should not be the way they are. Maybe we CAN find a way to workaround, or make the results somewhat better, but so far it appears that there is only one actual AMD employee (bsavery) who answers questions on this forum. So with all this info put forth in this thread so far, the only progress from him has been that: he can't reproduce it, and "When hooking up the normal map the reflection goes away you claim?" So after that response from him I really didn't want to be a jerk, but I don't know how to respond, if he really is the only employee who monitors this forum, then I don't blame him for not being able to really be too involved here, but everything I have posted since the beginning of this thread has been very descriptive, if not very redundant, so his reply of "When hooking up the normal map the reflection goes away you claim?" makes it clear that all the information I have provided thus far, most of which is repeated by me in each response, either isn't being read, is unclear, or is too long winded, and they don't want to deal with reading it all again. So I will probably just abandon this thread and either give up on this, or start another thread and try to dumb it down, shorten it and try to be concise. Because if I try to explain, yet again, the simple issue of ALL (reflection, clearcoat, diffuse) the normals not being "calculated" or shown correctly when using ProRender, and post even more example images, all it's going to do is make this thread even longer and redundant. ALL the examples I could possibly give are already there, and you have also reproduced this, and shown a few ways to try and improve these results. If they want to actually help solve this or just explain to us why it is doing this, they have lots of info to look at if they choose and we've both made it clear we are very willing to provide whatever else they may need to investigate further. Unfortunately being a free piece of software we are kind limited as far as what we can ask for, although even if ProRender was a paid piece of software, it would still be my number one choice and I would gladly pay for it, and maybe they would have more resources to help answer this question better. Please don't take anything I write as negative here, I am very happy to have your help, and future help from you, and this also goes for bsavery, you seem to be one of few from AMD helping on this forum, so I am sure you are very busy with it all so if what you need from me is something other than what I have given so far, please let me know. I won't bother posting any other examples or anything here, unless requested from you, since it's already too long for most sane people to ever be wing to read from the beginning. Thank you both again!
- Mark as New
- Bookmark
- Subscribe
- Mute
- Subscribe to RSS Feed
- Permalink
- Report Inappropriate Content
I won't go so far as to say "too long winded" but it is a bit hard to distill down all the information in this thread to something actionable. Long posts with no paragraph breaks makes it a bit harder to get the information I need to do anything with this thread.
Generally speaking I want to raise a few points here. Mainly that RPR is not calculating any normals or geometry. Everything is coming straight from Blender. This is why you see a similar issue below in Lux Render. So this issue is either 1. a blender bug or 2. an RPR bug if we are doing something wrong with shading or handling the geometry after getting it from Blender. Note that Cycles could be getting geometry slightly differently because they do not go through the python interface like other render engines.
I'd tending to lean towards (1) here. But I could be proven otherwise. Here's my suggestion to make this thread useful. Give a simple minimal example (like a small piece of geometry and one normal map or something) and post that with steps of how it works and how it causes artifacts. It is possible there is a simple bug here bug there's a lot of words above to read to get there!
- Mark as New
- Bookmark
- Subscribe
- Mute
- Subscribe to RSS Feed
- Permalink
- Report Inappropriate Content
Very good answer, and good point between cycles and others, regarding the way they are integrated into blender. This problem with the shading is not always a problem, and can be mitigated with a little work, so I will leave this thread alone to grow old. But I do hope to get whatever is causing my system to have trouble with ProRender as of late, solved though. Thanks very much for helping out.
- Mark as New
- Bookmark
- Subscribe
- Mute
- Subscribe to RSS Feed
- Permalink
- Report Inappropriate Content
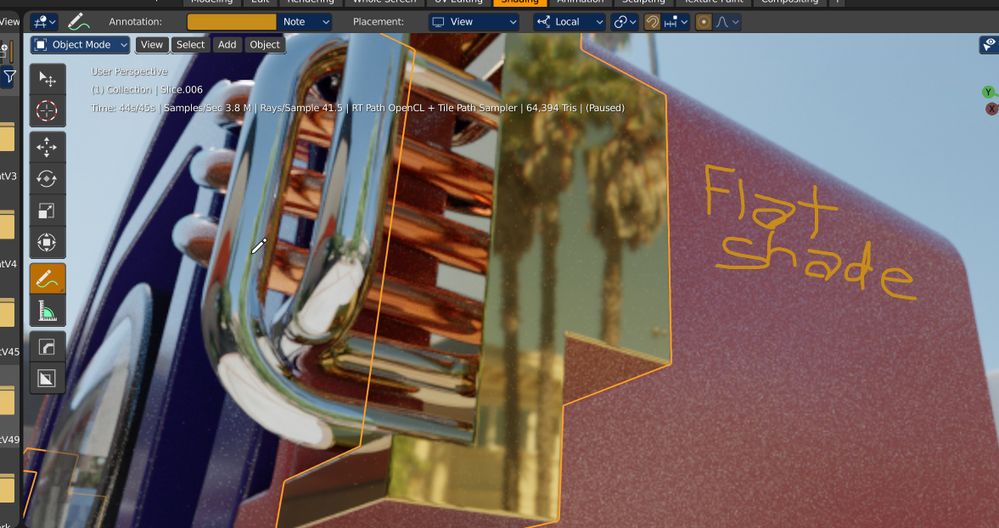
I know I just wrote this morning that I'm not going to bother adding more to this, but I found a little more possible info on this problem, at least to the very original question that started this thread. The underlying geometry showing may, or may not, be directly related to the fact that the normals seem to be incorrect, like in all the posted images of the wood material on the floor in the little hallway mockup I made towards the end of this thread. Having pointed that out, I downloaded and tested out LuxcoreRender for Blender, and it feels somewhat similar to using ProRender, but definatley not as fast or familiar as prorender, and it uses it's own Nodes, and editor, strangely. But I do like the way it integrates adding filters and effects without having to use the compositor after final render, it actually does a good job applying options like bloom, mist, and chromatic aberration to the preview render in real time, which is nice. So I rendered the second scene I posted in this thread, the one with the gold objects which show the strange lines in the reflections. When rendering with Luxrender the same lines do appear, because I believe Luxrender uses some type of texture when you make a metal material using it's own node presets, just like ProRender does with it's brass material. The difference I noticed here is that if I shade the mesh with "smooth shading" the lines appear, but with "Flat shading" the surface is perfect. These "lines" are there in the topology because the mesh is beveled, and it chooses to solve the beveled mesh because the bevels make it necessary. But for some reason this topology doesn't show in the surface reflections if smooth shaded is off, and set to flat instead. Here are the pics of the Luxcore Renders, one with flat shading on the gold object, the other with smooth shading. Maybe this won't help at all, but maybe it can.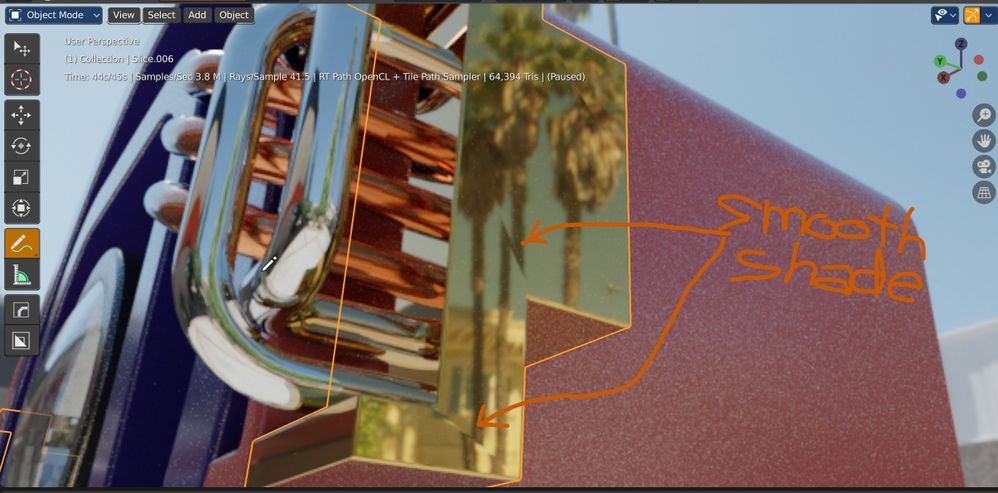
- Mark as New
- Bookmark
- Subscribe
- Mute
- Subscribe to RSS Feed
- Permalink
- Report Inappropriate Content
Hi jl5086, it's been almost a year since your post. I found it while dealing with the same issue. I don't know if you still have this or you switched to a more productive rendering solution?
I wanted to report that, purely by chance and in no way by knowledge, I stumbled upon changing an obscure/occult sounding value in Radeon ProRender quality setting called 'Ray Cast Epsilon (mm)' to a significantly larger value and visible underlying triangulation issues were gone.
Since you are dealing with architecture scale models, like me, maybe this was the issue with your renders, too?
Cheers.